So, you have been tasked with upgrading the EOS on Arista switch. Now you are wondering how its done.
Most of the Arista switches come with USB ports on them and using a flash drive is the easiest way (personal opinion). So, lets get to it.
Here are the step
1. Download the EOS you need to upgrade to from Arista
2. Connect and login to the switch and backup old configurations
3. Upgrade the EOS
4. Verify the EOS is at the level you upgraded to
Download the EOS from Arista
Go to https://www.arista.com/en/login and search for your version of the EOS and download it to your system. Note that you will need a service contract with Arista for you to be able to download any EOS.
After you download the .swi file copy it to a flash drive which you will use at the switch. Now you are ready to proceed to next step.
Connect and login to the switch and backup old configuration
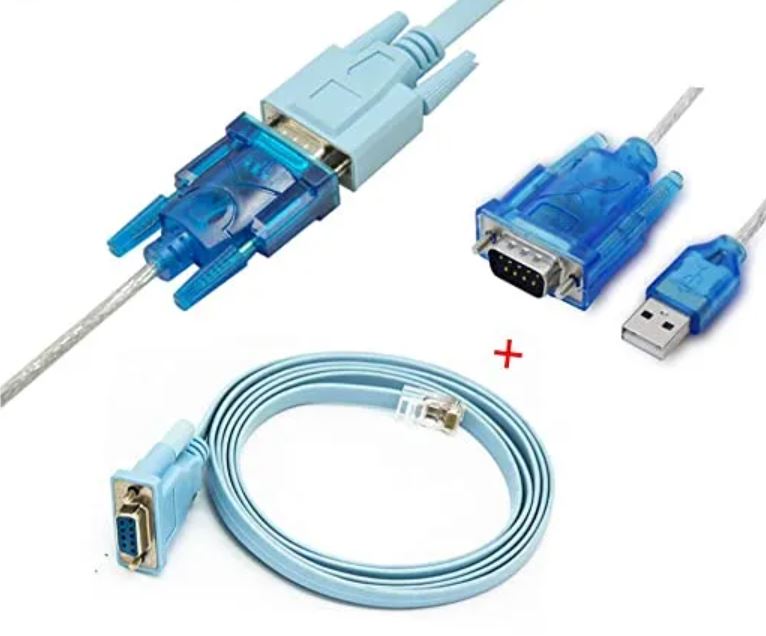
Connect the RJ45 connection of the console cable to the switch console port and the other DB9 end to the DB9 to USB adapter. Then connect the USB of the adapter to your system USB port. (if you have the newer console cable you don’t need the adapter)
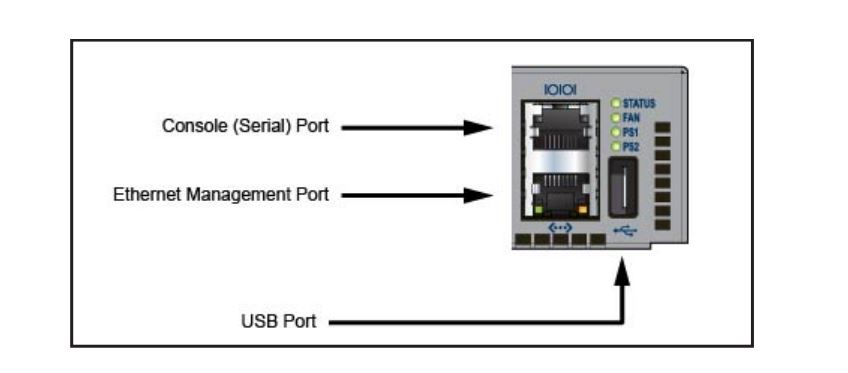
Console (Serial) Port:
Step 1: Connect to a PC with the RJ-45 to DB-9 serial adapter cable.The switch uses the following default settings:
•9600 baud
•No flow control
•1 stop bit
•No parity bits
•8 data bits
Now open a putty session using the setting above. This will bring you to the login welcome page with login prompt. Login using the user/password or if this is the first time use the default user (admin) without any password.
If this is the first time you are logging into the system you will need to disable the zerotouch setting which will reboot the unit.
switch1#zerotouch disableAfter the reboot is complete backup your old settings and update the EOS image. Below is the step by step process.
Log into the switch
switch1 login: adminSwitch to privileged mode
switch1>enShow the current version of the image
switch1#show version
Arista DCS-7160-32CQ-R
Hardware version: 11.01
Serial number: SERIALNUMBER
System MAC address: MA-CA-DD-RE-SS-01
Software image version: 4.19.10M
Architecture: i386
Internal build version: 4.19.10M-9408997.41910M
Internal build ID: 17392aac-2273-48b1-9b9d-46e1460af23a
Uptime: 6 days, 3 hours and 6 minutes
Total memory: 3894332 kB
Free memory: 2383052 kB
(Software image version: 4.19.10M) in the example above and we want to upgrade to 4.20.8M. Now that we have confirmed the current version lets back up our settings just in case something goes wrong during the upgrade, we have a fall back point.
switch1#copy running-config flash:/backu_config_12_27_201Verify the backup is there. Check for the file name you created.
switch1#dir flash:
Directory of flash:/
-rwx   611601607            Aug 3 02:31  EOS-4.19.8M.swi
-rwx          77           Dec 21 19:13  SsuRestore.log
-rwx        3367           Dec 27 21:47  backu_config_12_27_2018
-rwx          26            Aug 3 02:32  boot-config
drwx        4096           Dec 21 19:14  debug
drwx        4096           Dec 21 19:14  persist
drwx        4096            Aug 3 02:41  schedule
-rwx        3436           Dec 21 19:19  startup-config
-rwx           0           Dec 21 19:14  zerotouch-config

3899371520 bytes total (2674806784 bytes free)
At this point connect the USB drive with the new image to the USB port of the unit.
Verify that you can see/access to the new image.
switch1#dir usb1:
Directory of usb1:/
-rwx   624851131           Dec 27 14:55  EOS-4.20.8M.swi
-rwx          50           Dec 27 15:14  EOS-4.20.8M.swi.md5sum
drwx       32768           Apr 12 15:12  System Volume Information
Copy the file from the USB drive to the system flash:
switch1#copy usb1:/EOS-4.20.8M.swi flash:/EOS-4.20.10M.swi
 Copy completed successfully.
Verify the MD5 checksum matches. This will confirm the integrity of the file.
switch1#verify /md5 flash:/EOS-4.20.8M.swi
 verify /md5 (flash:/EOS-4.20.8M.swi) = 1059d4a6789bb606ccfd5c5cc5eba37a
Configure the unit to boot using the new image, save everything and reboot.
switch#config t
switch1(config)#boot system flash:/EOS-4.20.8M.swi

switch1(config)#write memory
 Copy completed successfully.

switch1(config)#exit

switch1#copy run start
 Copy completed successfully.

switch1#reload
 Proceed with reload? [confirm]
 Broadcast message from root@switch1 (Thu Dec 27 22:34:24 2018):
 The system is going down for reboot NOW!
 Flushing AAA accounting queue: [  OK  ]
 Restarting system
After the reboot is complete, login to the system and verify that the system is running the new image.
switch1>en
switch1#show version
Arista DCS-7160-32CQ-R
Hardware version: 11.01
Serial number: SERIALNUMBER
System MAC address: MA-CA-DD-RE-SS-01
Software image version: 4.20.8M
Architecture: i386
Internal build version: 4.20.8M-9384033.4208M
Internal build ID: 5c08e74b-ab2b-49fa-bde3-ef7238e2e1ca
Uptime: 0 weeks, 0 days, 0 hours and 4 minutes
Total memory: 7919124 kB
Free memory: 6656216 kB
This shows the new image version 4.20.8M which is what we upgraded to.
This task is now complete and you can proceed to configure the switch or bring it back online for production if it is already configured.
As always, let me know if you have any questions.
Key Insights
- Regularly upgrading Arista EOS helps improve network stability, security, and performance.
- Proper planning and verification before an upgrade reduces the risk of downtime and configuration issues.
- Backing up the current configuration is essential before making any system changes.
- Testing EOS upgrades in a lab environment helps identify potential compatibility problems.
- Following a structured upgrade process ensures consistent results across multiple switches.
- Verifying system health after the upgrade confirms that network services are operating correctly.
- Scheduling upgrades during maintenance windows minimizes impact on production environments.
- Maintaining clear documentation of versions and changes simplifies future troubleshooting and audits.